Cross-platform C SDK logo

Cross-platform C SDK

New linux machine

Next ❯

We are going to detail, step by step, the configuration process of a new Linux machine destined to the development of C/C++ projects. Linux offers a wide variety of environments, versions, and configurations. It will be very helpful to be able to test our developments on most platforms.


1. VirtualBox

It is unlikely (or impractical) that we have physical machines for each and every one of the versions of Linux where we are going to work. Virtualization will be our great ally and VirtualBox a good option.

  • Create a new virtual machine with 4Gb of Ram, 2 Processors and 64Mb of Video.
  • 50 Gb HDD dynamically reserved.
  • Network->Bridget Adapter.
  • From Storage, select the *.iso image inside the Optical Drive.
  • Boot the virtual machine and install the system in question.
  • Enable Drag&Drop and Copy/Paste.
    • VirtualBox->Preferences->Extensions->Add VBox Extension Pack.
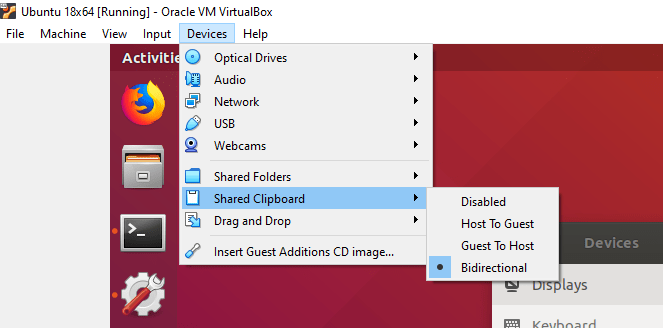
    • On the virtual machine: Devices->Insert Guest Additions CD Image (Figure 1).
    • On the virtual machine: Devices->Drag And Drop->Bidirectional.
    • On the virtual machine: Devices->Shader Clipboard->Bidirectional (Figure 2).
    • Restart the virtual machine.
    • Linux terminal after running the Guest Additions CD Image.
      Figure 1: Running the Guest Additions CD Image on Ubuntu 18.
      Screenshot of VirtualBox Devices->Shared Clipboard menu.
      Figure 2: Activating the Shared Clipboard in the virtual machine.

2. Enable stale repositories

In the event that the distribution is outdated, it is likely that we will need to update the repository paths, in order to be able to install the necessary packages:


3. Initial setup

Whether it is a virtual machine or a physical machine, the first steps in the configuration will be:

  • Screen Resolution, at least 1680x1050 (Figure 3).
  • Disable Lock Screen (Figure 4).
  • Update packages to the latest version:
  •  
    
    sudo apt-get update        // Debian/Ubuntu
    sudo yum check-update      // Red-Hat/CentOS
    sudo pacman -Syu           // Arch/Manjaro
    
    Ubuntu 18 Devices->Display Menu.
    Figure 3: Change resolution in Ubuntu 18.
    Ubuntu 18 Privacy->Screen Lock Menu.
    Figure 4: Disable Screen Lock in Ubuntu 18.

4. Development tools

Herramientas esenciales
 
sudo apt-get install build-essential  // Debian/Ubuntu
sudo pacman -S base-devel             // Arch/Manjaro
Librerías de desarrollo
 
sudo apt-get install libgtk-3-dev
sudo apt-get install glade
sudo apt-get install libglu1-mesa-dev freeglut3-dev mesa-common-dev
sudo apt-get install libcurl4-openssl-dev
Additional packages
 
sudo apt-get install gtk-3-examples
sudo apt-get install devhelp
sudo apt-get install gdebi
Visual Studio Code
 
sudo apt-get install code
GitHub Desktop
 
https://github.com/shiftkey/desktop/releases

Install with GDebi

5. Subversion

 
sudo apt-get install subversion

svn --version
svn, version 1.9.7 (r1800392)

If the version of Subversion is less than 1.8, update it:

 
sudo sh c 'echo "deb http://opensource.wandisco.com/ubuntu `lsb_release -cs` svn18" >> /etc/apt/sources.list.d/subversion18.list'
sudo wget -q http://opensource.wandisco.com/wandisco-debian.gpg -O | sudo apt-key add -
sudo apt-get update
sudo apt-get remove subversion
sudo apt-get install subversion
 
nano .bashrc

// ADD
export SVN_NAPP=svn://192.168.1.2/svn/NAPPGUI

source .bashrc

echo $SVN_NAPP
svn://192.168.1.2/svn/NAPPGUI

6. CMake

 
sudo apt-get install cmake cmake-qt-gui

cmake -version
cmake version 3.10.2

If the version of CMake is less than 2.8.12, update it.

Next ❯