


Die
This page has been automatically translated using the Google Translate API services. We are working on improving texts. Thank you for your understanding and patience.
Beautiful code is likely to be simple -- clear and easy to understand. Beautitful code is likely to be compact -- just enough code to do the job and no more -- but not cryptic, to the point where it cannot be understood. Beautiful code may well be general, solving a broad class of problems in a uniform way. One might even describe it as elegant, showing good taste and refinement. Brian Kernighan
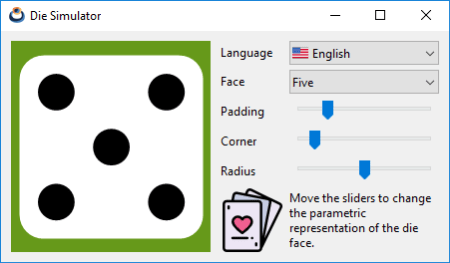
As the road is made by walking, we will devote a few chapters to deepen the use of NAppGUI hand in hand with real applications. Our goal is to present programs of a certain level, halfway between the simple "book examples" and the commercial applications. In this first demo we have a program that allows us to draw the silhouette of a die (Figure 1) and that will serve as an excuse to introduce concepts of parametric drawing, composition of layouts and use of resources. The source code is in folder /src/demo/die of the SDK distribution. In Create new application and Resources we saw how to create the project from scratch.
1. Use of sublayouts
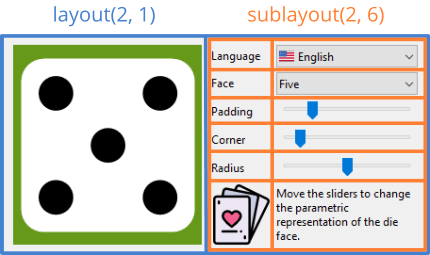
We started working on the user interface, which we have divided into two areas: a customized view (View) where we will draw the representation of the die in 2D, and a zone of controls where we can interact with this drawing. As we already saw in Hello World! we will use Layout objects to locate the controls inside the main window. However, we observe that this arrangement of elements does not fit well in a single table, therefore, we will use two horizontal cells as the main container and a grid of two columns and six rows for the controls (Listing 1) (Listing 1). This second layout will be located in the right cell of the first container and we will say that it is a sublayout of the main layout.
1 2 3 4 5 6 7 8 9 10 11 12 13 14 15 16 |
Layout *layout = layout_create(2, 1); Layout *layout1 = layout_create(2, 6); layout_view(layout, view, 0, 0); layout_label(layout1, label1, 0, 0); layout_label(layout1, label2, 0, 1); layout_label(layout1, label3, 0, 2); layout_label(layout1, label4, 0, 3); layout_label(layout1, label5, 0, 4); layout_view(layout1, vimg, 0, 5); layout_popup(layout1, popup1, 1, 0); layout_popup(layout1, popup2, 1, 1); layout_slider(layout1, slider1, 1, 2); layout_slider(layout1, slider2, 1, 3); layout_slider(layout1, slider3, 1, 4); layout_label(layout1, label6, 1, 5); layout_layout(layout, layout1, 1, 0); |
In the same way that we did in Layout format we have established certain margins and a fixed width for the controls column.
1 2 3 4 5 6 7 8 9 10 |
view_size(view, s2df(200.f, 200.f)); layout_margin(layout, 10.f); layout_hsize(layout1, 1, 150.f); layout_hmargin(layout, 0, 10.f); layout_hmargin(layout1, 0, 5.f); layout_vmargin(layout1, 0, 5.f); layout_vmargin(layout1, 1, 5.f); layout_vmargin(layout1, 2, 5.f); layout_vmargin(layout1, 3, 5.f); layout_vmargin(layout1, 4, 5.f); |
2. Use of Custom Views
View are controls that will allow us to design our own widgets. On the contrary that happens with another type of components, like Slider or Button, here we will have total freedom to draw anything. We can interact with the control by capturing its events (mouse, keyboard, etc) and implementing the appropriate handlers. These views are integrated into the layout like any other component (Listing 3).
1 2 3 |
View *view = view_create(); view_size(view, s2df(200.f, 200.f)); layout_view(layout, view, 0, 0); |
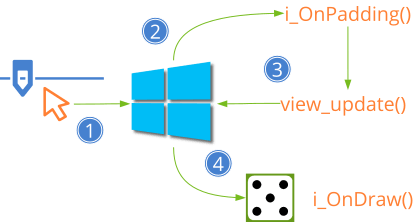
We can not draw inside a View whenever we want. We will have to make a request to the operating system through the method view_update (Listing 4), since the drawing area can affect overlapping windows and this must be managed centrally. When the control is ready to refresh, the system will send an event EvDraw that we must capture through view_OnDraw.
1 2 3 4 5 6 7 8 9 10 11 12 13 14 15 |
static void i_OnPadding(App *app, Event *e) { const EvSlider *params = event_params(e, EvSlider); app->padding = params->pos; view_update(app->view); } static void i_OnDraw(App *app, Event *e) { const EvDraw *params = event_params(e, EvDraw); die_draw(params->context, params->width, params->height, app); } slider_OnMoved(slider1, listener(app, i_OnPadding, App)); view_OnDraw(view, listener(app, i_OnDraw, App)); |
Each time the user moves a slider (padding parameter, for example) the operating system captures the action and informs the application through the method i_OnPadding (Figure 5). Because the action involves a change in the drawing, this method calls view_update to inform the system again that the view must be updated. When it considers it appropriate, send the event EvDraw, which is captured by i_OnDraw where the drawing is regenerated with the new parameters.
3. Parametric drawing
Under this concept we describe the ability to generate vector images from a few numerical values known as parameters (Figure 6). It is used a lot in the computer-aided design (CAD), it allows you to make adjustments easily in planes or models without having to edit, one by one, a lot of primitives.
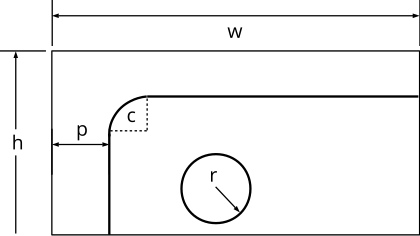
In our application, the representation of the die can change at runtime as the user manipulates the sliders or sizes the window, so we calculate the position and size of their primitives using parametric formulas. Once resolved, we created the drawing with three simple API commands Drawing primitives.
- draw_clear. Clear the entire drawing area using a solid color.
- draw_rndrect. Draw a rectangle with rounded corners.
- draw_circle. Draw a circle.
1 2 3 4 5 6 7 8 9 10 11 12 13 14 15 16 17 18 19 20 21 22 23 24 25 26 27 28 29 30 31 32 33 34 35 36 37 38 39 40 41 42 43 44 45 46 47 48 49 50 51 52 53 54 55 56 57 |
/* Die drawing */ #include "ddraw.h" #include <draw2d/draw2dall.h> /*---------------------------------------------------------------------------*/ static const real32_t i_MAX_PADDING = 0.2f; const real32_t kDEF_PADDING = .15f; const real32_t kDEF_CORNER = .15f; const real32_t kDEF_RADIUS = .35f; /*---------------------------------------------------------------------------*/ void die_draw(DCtx *ctx, const real32_t x, const real32_t y, const real32_t width, const real32_t height, const real32_t padding, const real32_t corner, const real32_t radius, const uint32_t face) { color_t white = color_rgb(255, 255, 255); color_t black = color_rgb(0, 0, 0); real32_t dsize, dx, dy; real32_t rc, rr; real32_t p1, p2, p3; dsize = width < height ? width : height; dsize -= bmath_floorf(2.f * dsize * padding * i_MAX_PADDING); dx = x + .5f * (width - dsize); dy = y + .5f * (height - dsize); rc = dsize * (.1f + .3f * corner); rr = dsize * (.05f + .1f * radius); p1 = 0.5f * dsize; p2 = 0.2f * dsize; p3 = 0.8f * dsize; draw_fill_color(ctx, white); draw_rndrect(ctx, ekFILL, dx, dy, dsize, dsize, rc); draw_fill_color(ctx, black); if (face == 1 || face == 3 || face == 5) draw_circle(ctx, ekFILL, dx + p1, dy + p1, rr); if (face != 1) { draw_circle(ctx, ekFILL, dx + p3, dy + p2, rr); draw_circle(ctx, ekFILL, dx + p2, dy + p3, rr); } if (face == 4 || face == 5 || face == 6) { draw_circle(ctx, ekFILL, dx + p2, dy + p2, rr); draw_circle(ctx, ekFILL, dx + p3, dy + p3, rr); } if (face == 6) { draw_circle(ctx, ekFILL, dx + p2, dy + p1, rr); draw_circle(ctx, ekFILL, dx + p3, dy + p1, rr); } } |
The drawing commands are reflected on a canvas, also known as context DCtx. This object reaches to i_OnDraw as parameter of the event EvDraw. In this case, the canvas is provided by the View control itself, but it is also possible to create contexts to draw directly in memory.
4. Resizing
In this application, the window can be resized by stretching the cursor over its edges, which is common in desktop programs. Let's see some basic aspects about this feature not present in Hello World!, which had a static window. The first thing is to enable the option inside the window's constructor.
1 |
window_create(ekWINDOW_STDRES, &panel); |
When a window changes in size, the inner controls should do so proportionally as well as change its location within the panel. This management is carried out within each Layout object. When the window starts, the default size of each layout is calculated by applying the natural sizing, which is the result of the initial size of the controls plus the margins, as we saw in Layout format. When we stretch or contract the window, the pixel difference between natural and real dimensioning is distributed between the columns of the layout (Figure 7). The same happens with the vertical difference, which is distributed among its rows. If a cell contains a sublayout, this increment will be recursively distributed by its own columns and rows.
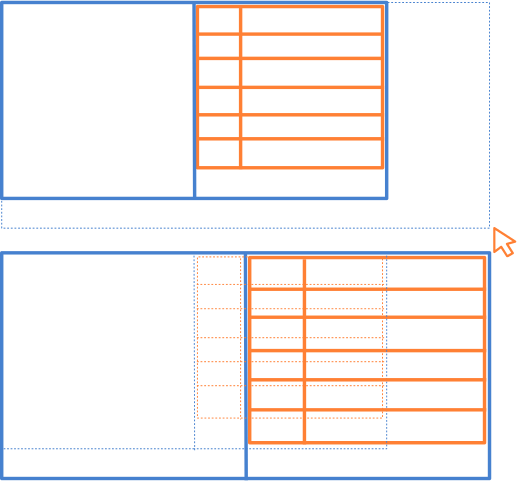
Layout.But in this particular case, we want the whole increment to go to the drawing area (column 0). In other words, we want the column of the controls to remain fixed and not grow (Figure 8). For this we must change the proportion of the resized:
1 |
layout_hexpand(layout, 0);
|
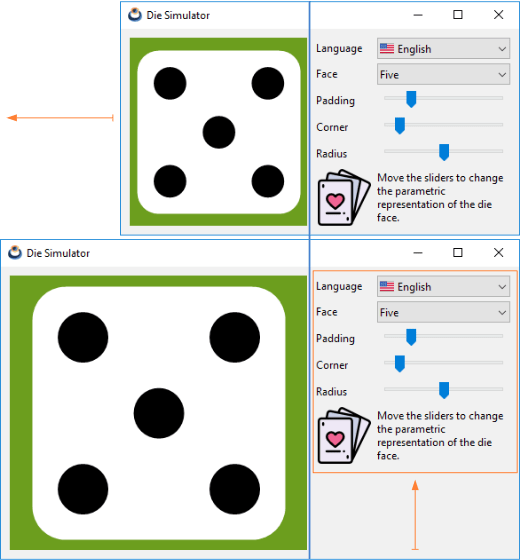
With this function 100% of the horizontal surplus will go to column 0. By default, they had a proportion of (50%, 50%) since they are two columns (33% for three, 25% for four, etc). With this we would have resolved the resizing for the X dimension of the window, but what happens with the vertical? In the main layout, we only have one row that, when expanded, will change the height of the custom view. But this expansion will also affect the cell on the right, where the controls will also grow vertically due to the recursive increase of pixels in the sublayout rows. To solve it, we force the vertical alignment ekTOP in the right cell of the layout.
1 |
layout_valign(layout, 1, 0, ekTOP); |
instead of ekJUSTIFY, which is the default alignment for sublayouts. In this way, the content of the cell (the entire sublayout) will not expand vertically, but it will adjust to the upper edge leaving all the free space in the lower part of the cell. Obviously, if we use ekCENTER or ekBOTTOM, the sublayout will center or adjust to the bottom edge.
5. Use of resources
Both the text and the icons that we have used in Die have been outsourced in the resource package all. Thanks to this, we can perform an automatic translation of the interface between the English and Spanish languages. You can check Resources to get detailed information on how text and images have been assigned in the program interface.
1 2 3 4 5 6 7 8 9 10 11 12 13 14 15 16 |
/* Die strings */
TEXT_FACE       Face
TEXT_PADDING    Padding
TEXT_CORNER     Corner
TEXT_RADIUS     Radius
TEXT_ONE        One
TEXT_TWO        Two
TEXT_THREE      Three
TEXT_FOUR       Four
TEXT_FIVE       Five
TEXT_SIX        Six
TEXT_TITLE      Die Simulator
TEXT_INFO       Move the sliders to change the parametric representation of the die face.
TEXT_LANG       Language
TEXT_ENGLISH    English
TEXT_SPANISH    Spanish
|
1 2 3 4 5 6 7 8 9 10 11 12 13 14 15 16 |
/* Die strings */
TEXT_FACE       Cara
TEXT_PADDING    Margen
TEXT_CORNER     Borde
TEXT_RADIUS     Radio
TEXT_ONE        Uno
TEXT_TWO        Dos
TEXT_THREE      Tres
TEXT_FOUR       Cuatro
TEXT_FIVE       Cinco
TEXT_SIX        Seis
TEXT_TITLE      Simulador de dado
TEXT_INFO       Mueve los sliders para cambiar la representación paramétrica de la cara del dado.
TEXT_LANG       Idioma
TEXT_ENGLISH    Inglés
TEXT_SPANISH    Español
|
6. Die and Dice
This application has been used as a guiding thread of the Create new application chapter and following from the NAppGUI tutorial. The complete example consists of two applications (Die and Dice), as well as the casino library that groups the common routines for both programs (Figure 9). You have the three complete projects ready to compile and test in the folder src/demo of SDK distribution.

7. The complete Die program
1 2 3 4 5 6 7 8 9 10 11 12 13 14 15 16 17 18 19 |
1 2 3 4 5 6 7 8 9 10 11 12 13 14 15 16 17 18 19 20 21 22 23 24 25 26 27 28 29 30 31 32 33 34 35 36 37 38 39 40 41 42 |
/* Die application */ #include "dgui.h" #include <nappgui.h> /*---------------------------------------------------------------------------*/ static void i_OnClose(App *app, Event *e) { osapp_finish(); unref(app); unref(e); } /*---------------------------------------------------------------------------*/ static App *i_create(void) { App *app = heap_new0(App); app->padding = 0.2f; app->corner = 0.1f; app->radius = 0.5f; app->face = 5; app->window = dgui_window(app); window_origin(app->window, v2df(200.f, 200.f)); window_OnClose(app->window, listener(app, i_OnClose, App)); window_show(app->window); return app; } /*---------------------------------------------------------------------------*/ static void i_destroy(App **app) { window_destroy(&(*app)->window); heap_delete(app, App); } /*---------------------------------------------------------------------------*/ #include <osapp/osmain.h> osmain(i_create, i_destroy, "", App) |
1 2 3 4 5 6 7 8 9 10 11 12 13 14 15 16 17 18 19 20 21 22 23 24 25 26 27 28 29 30 31 32 33 34 35 36 37 38 39 40 41 42 43 44 45 46 47 48 49 50 51 52 53 54 55 56 57 58 59 60 61 62 63 64 65 66 67 68 69 70 71 72 73 74 75 76 77 78 79 80 81 82 83 84 85 86 87 88 89 90 91 92 93 94 95 96 97 98 99 100 101 102 103 104 105 106 107 108 109 110 111 112 113 114 115 116 117 118 119 120 121 122 123 124 125 126 127 128 129 130 131 132 133 134 135 136 137 138 139 140 141 142 143 144 145 146 147 148 149 150 151 152 153 154 155 156 157 158 159 160 161 162 163 164 165 |
/* Die Gui */ #include "dgui.h" #include "res_die.h" #include <casino/ddraw.h> #include <gui/guiall.h> /*---------------------------------------------------------------------------*/ static void i_OnDraw(App *app, Event *e) { color_t green = color_rgb(102, 153, 26); const EvDraw *params = event_params(e, EvDraw); draw_clear(params->ctx, green); die_draw(params->ctx, 0, 0, params->width, params->height, app->padding, app->corner, app->radius, app->face); } /*---------------------------------------------------------------------------*/ static void i_OnAcceptFocus(App *app, Event *e) { bool_t *r = event_result(e, bool_t); unref(app); *r = FALSE; } /*---------------------------------------------------------------------------*/ static void i_OnFace(App *app, Event *e) { const EvButton *params = event_params(e, EvButton); app->face = params->index + 1; view_update(app->view); } /*---------------------------------------------------------------------------*/ static void i_OnPadding(App *app, Event *e) { const EvSlider *params = event_params(e, EvSlider); app->padding = params->pos; view_update(app->view); } /*---------------------------------------------------------------------------*/ static void i_OnCorner(App *app, Event *e) { const EvSlider *params = event_params(e, EvSlider); app->corner = params->pos; view_update(app->view); } /*---------------------------------------------------------------------------*/ static void i_OnRadius(App *app, Event *e) { const EvSlider *params = event_params(e, EvSlider); app->radius = params->pos; view_update(app->view); } /*---------------------------------------------------------------------------*/ static void i_OnLang(App *app, Event *e) { const EvButton *params = event_params(e, EvButton); const char_t *lang = params->index == 0 ? "en_us" : "es_es"; gui_language(lang); unref(app); } /*---------------------------------------------------------------------------*/ static Panel *i_panel(App *app) { Panel *panel = panel_create(); Layout *layout = layout_create(2, 1); Layout *layout1 = layout_create(2, 6); View *view = view_create(); Label *label1 = label_create(); Label *label2 = label_create(); Label *label3 = label_create(); Label *label4 = label_create(); Label *label5 = label_create(); Label *label6 = label_create(); PopUp *popup1 = popup_create(); PopUp *popup2 = popup_create(); Slider *slider1 = slider_create(); Slider *slider2 = slider_create(); Slider *slider3 = slider_create(); ImageView *img = imageview_create(); app->view = view; view_size(view, s2df(200, 200)); view_OnDraw(view, listener(app, i_OnDraw, App)); view_OnAcceptFocus(view, listener(app, i_OnAcceptFocus, App)); label_text(label1, TEXT_LANG); label_text(label2, TEXT_FACE); label_text(label3, TEXT_PADDING); label_text(label4, TEXT_CORNER); label_text(label5, TEXT_RADIUS); label_text(label6, TEXT_INFO); label_multiline(label6, TRUE); popup_add_elem(popup1, TEXT_ENGLISH, gui_image(USA_PNG)); popup_add_elem(popup1, TEXT_SPANISH, gui_image(SPAIN_PNG)); popup_OnSelect(popup1, listener(app, i_OnLang, App)); popup_add_elem(popup2, TEXT_ONE, NULL); popup_add_elem(popup2, TEXT_TWO, NULL); popup_add_elem(popup2, TEXT_THREE, NULL); popup_add_elem(popup2, TEXT_FOUR, NULL); popup_add_elem(popup2, TEXT_FIVE, NULL); popup_add_elem(popup2, TEXT_SIX, NULL); popup_OnSelect(popup2, listener(app, i_OnFace, App)); popup_selected(popup2, app->face - 1); slider_value(slider1, app->padding); slider_value(slider2, app->corner); slider_value(slider3, app->radius); slider_OnMoved(slider1, listener(app, i_OnPadding, App)); slider_OnMoved(slider2, listener(app, i_OnCorner, App)); slider_OnMoved(slider3, listener(app, i_OnRadius, App)); imageview_image(img, cast_const(CARDS_PNG, Image)); layout_view(layout, view, 0, 0); layout_label(layout1, label1, 0, 0); layout_label(layout1, label2, 0, 1); layout_label(layout1, label3, 0, 2); layout_label(layout1, label4, 0, 3); layout_label(layout1, label5, 0, 4); layout_imageview(layout1, img, 0, 5); layout_popup(layout1, popup1, 1, 0); layout_popup(layout1, popup2, 1, 1); layout_slider(layout1, slider1, 1, 2); layout_slider(layout1, slider2, 1, 3); layout_slider(layout1, slider3, 1, 4); layout_label(layout1, label6, 1, 5); layout_layout(layout, layout1, 1, 0); layout_margin(layout, 10); layout_hsize(layout1, 1, 150); layout_hmargin(layout, 0, 10); layout_hmargin(layout1, 0, 5); layout_vmargin(layout1, 0, 5); layout_vmargin(layout1, 1, 5); layout_vmargin(layout1, 2, 5); layout_vmargin(layout1, 3, 5); layout_vmargin(layout1, 4, 5); layout_hexpand(layout, 0); layout_valign(layout, 1, 0, ekTOP); panel_layout(panel, layout); return panel; } /*---------------------------------------------------------------------------*/ Window *dgui_window(App *app) { gui_respack(res_die_respack); gui_language(""); { Panel *panel = i_panel(app); Window *window = window_create(ekWINDOW_STDRES); window_panel(window, panel); window_title(window, TEXT_TITLE); return window; } } |
1 2 3 4 5 6 7 8 |
/* Die Gui */ #include "die.hxx" __EXTERN_C Window *dgui_window(App *app); __END_C |